Adyen - Custom redirect implementation guide
Target Audience: Developers, Stakeholders
When should I choose the custom redirect implementation?
You don't need all the features of the PPF but feel that implementing the payment flow is a bit much. Maybe you want to collect e-mail and other customer data but feel that integrating with the PARP is a bit much and not needed for your use case.
Customer redirect strikes a middle-ground between all the implementations in complexity and what is required from the implementer.
Introduction
This document describes how to integrate your site with the Payway Adyen Redirect Provider directly without using the PCP purchase flow. See Implementation guide - PCP Redirect for more info.
Before you start planning and writing code
- Please read Getting started checklist
- Check out the code samples C# sample, Ruby sample
Requirements and setup
- Feature enabled by Adeprimo.
- Setup Adyen payment periods.
DNS configuration
See DNS/SSL configration for redirect integrations
SSL configuration
See DNS/SSL configration for redirect integrations
Notifications
See Adyen merchant portal configuration
Payment flow example
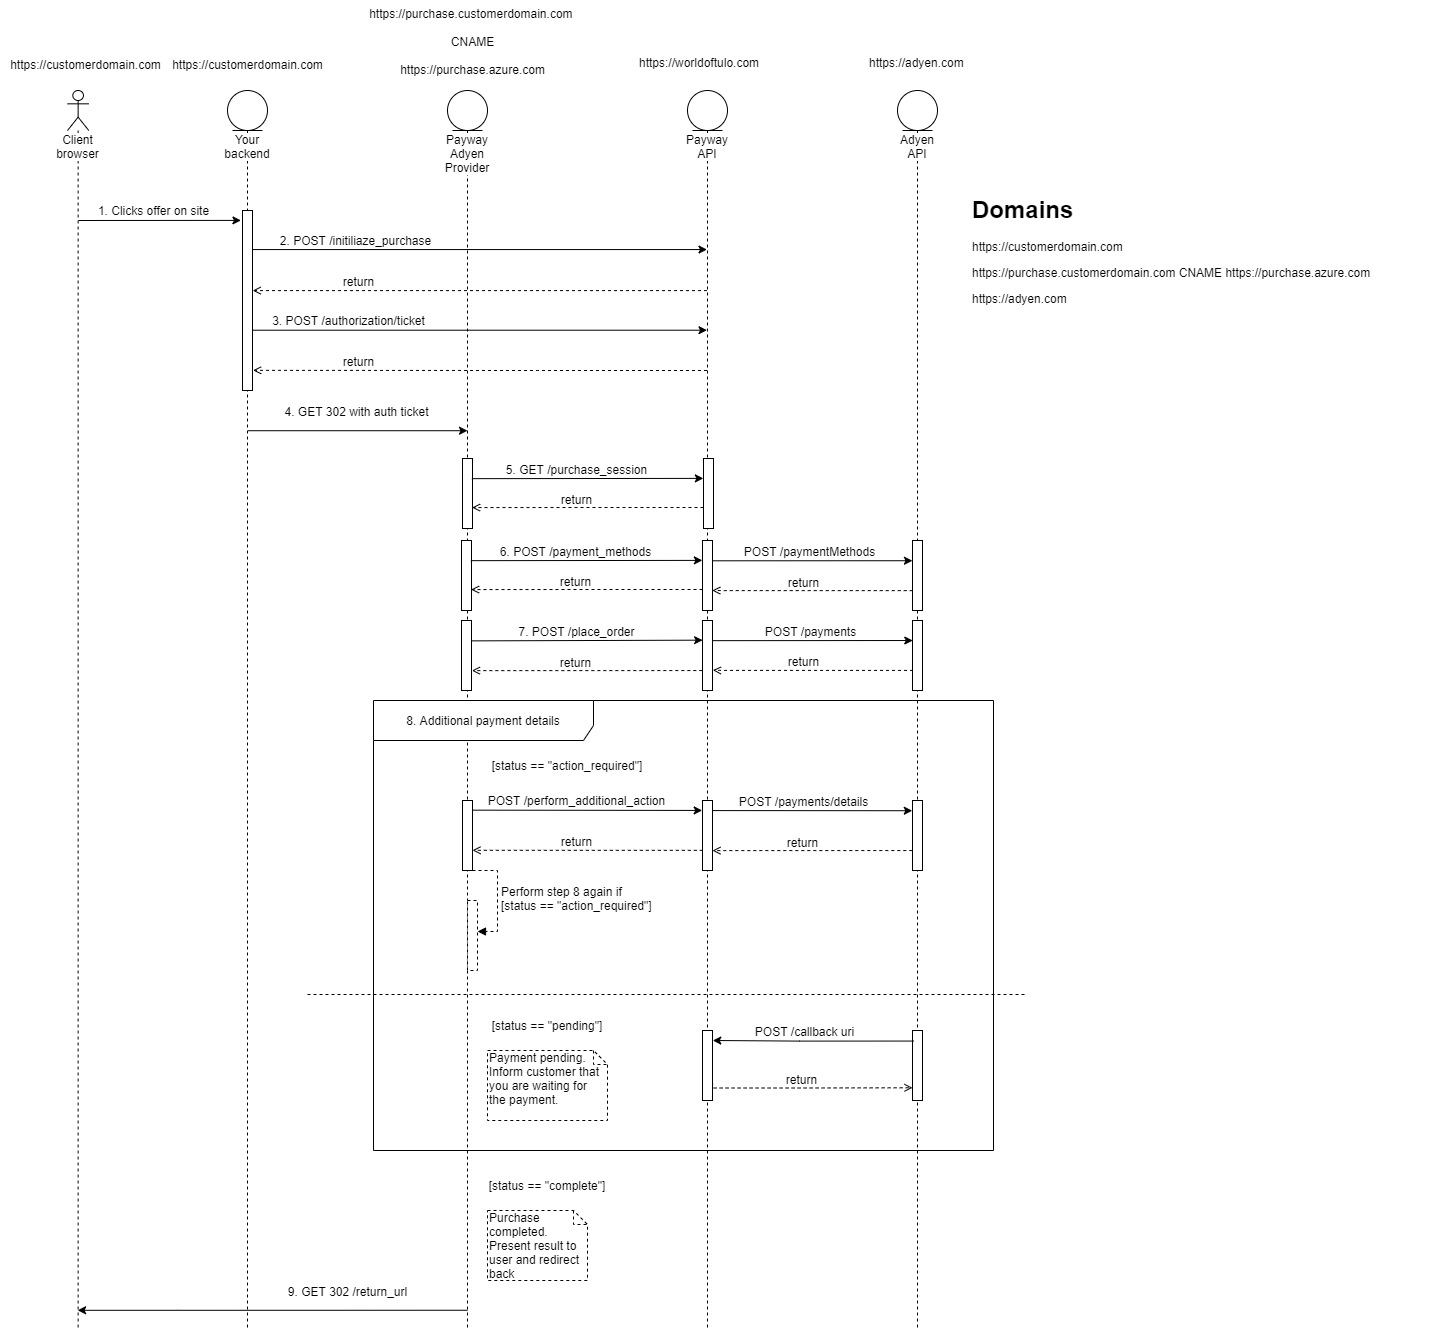
1. Clicks offer
The user clicks an offer on your site.
2. Create a PARP redirect URI
Before you can complete a purchase using the PARP you'll need to initialize a purchase session and build a PARP URI that you'll redirect the user to.
The URL is built using three parts.
- An authorization ticket
- A purchase session-id, a.k.a payment ref
- Your organizational id
d = "#{authentication_ticket}:#{paymentRef}:#{organisationId}"
d = Base64.encode64(encode)
d = URI::encode(encoded)

"#{parp_base_uri}/initialize/?d=#{d}"
The pseudo-code above should give you an understanding of how to build the URL. For more details check out the code samples C# sample, Ruby sample.
Part 1: Authentication ticket
The first part you'll need is an authorization ticket. See Ticket authentication for more info on creating an authorization ticket.
Part 2: Purchase session id
The second part you'll need is a purchase session id. See Initialize purchase for more info on creating a purchase session.
Part 3: Organisational id
You'll find your organizational identifier in the address bar when using PAP for example.
See Admin links for more info.
3. Redirect the user to PARP
The user is redirected to the redirect URI built-in step 2 and performs the purchase.
4. Result
After the user completes the purchase he or she will be redirected back to the provided URLs in part 2.
Depending on the result the user will be redirected back to a different return URL with varying query parameters.
| Scenario | Return URL used | URL format example | Description |
|---|---|---|---|
| Purchase completed | complete_url | https://example.com/success?status=complete&orderId=ORDER-123&receiptId=5aba2ca36fc93613f8000012 | Purchase completed successfully. You can use the parameter receiptId to present a receipt to the user |
| Purchase pending | complete_url | https://example.com/success?status=pending&orderId=ORDER-123 | Purchase completed but payment is still pending. The user will be notified by email when the transaction is completed. |
| Purchase cancelled | cancel_url | https://example.com/cancel | Purchase canceled by user |
| Purchase error | error_url | https://example.com/error?error_code=code&error_message=message | An error occurred during the purchase. See code and message for more details |
Testing
Before going live please be sure to complete the testing protocol.