Adyen - Checkout implementation guide
Target Audience: Developers
When should I choose the checkout implementation?
You want to integrate directly on your site and control all aspects of the purchase flow.
Of all the Payway-Adyen implementations, checkout requires the most from the implementer.
Introduction
This document describes how you integrate Adyen in your web applications using the Payway API. The integration towards Payway is API-based which means you do not need a Payway session to use this integration, an access token is sufficient.
The idea behind a checkout solution is that the customer is in full control of the purchase flow. This means you are free to build any kind of solution you want. But this also means you might need to implement the functionality you might take for granted found in PPF. Like account registration, purchase validation such as debt, or checking for an already active subscription.
Before you start planning and writing code
- Please read Getting started checklist
- Checkout the sample application for a general understanding of the payment flow.
Requirements and limitations
- Feature enabled by Adeprimo
- An access token for the user about to do the purchase with scope
/external/adyen/r /external/adyen/w - HTTPS on the purchase page
- Adyen payment periods.
Payment flow example
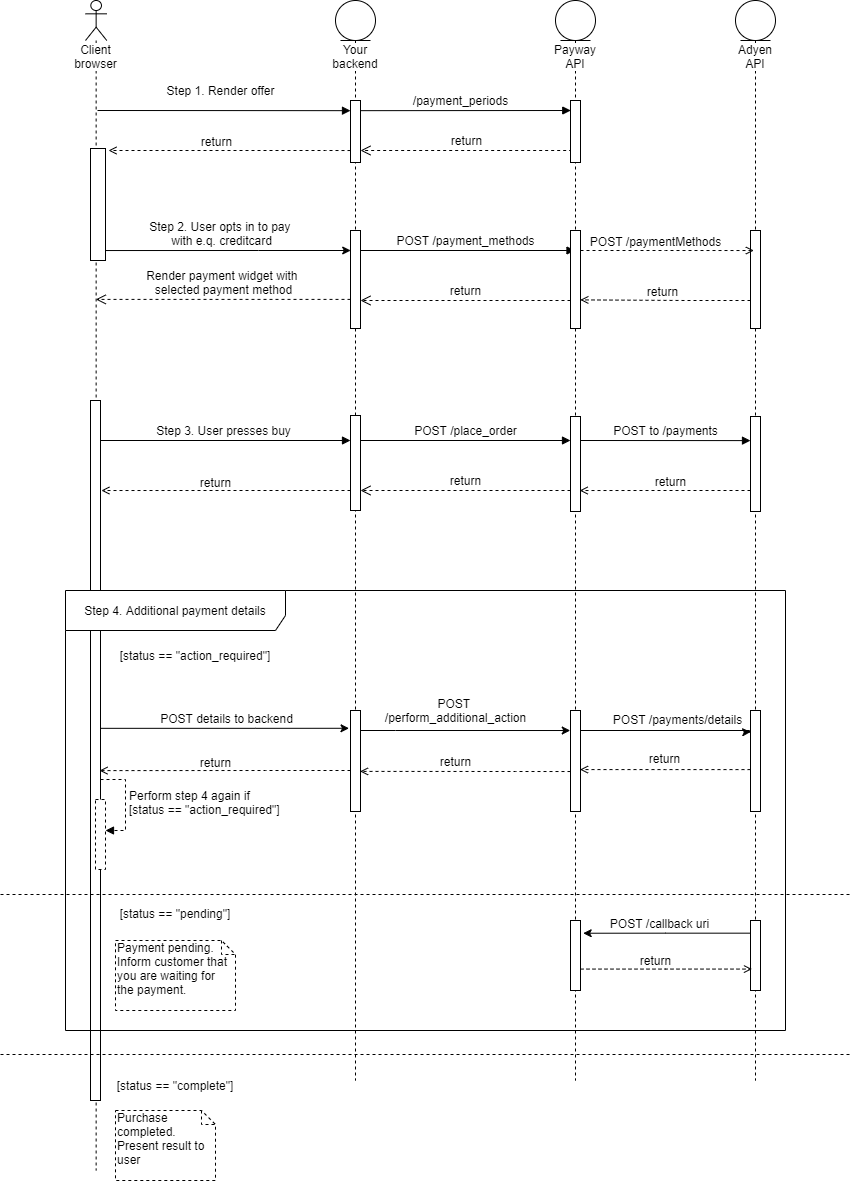
Step 1 Landing
Here you present your offer along with the available payment methods to the end-user. To better automate this process you can use the Product API to list the available payment methods.
Step 2 Configure the drop-in widget and initiate purchase
Here the user has opted into the purchase flow. Now you present the Adyen drop-in widget. First, you need to populate the widget with the selected payment method from Step 1.
Attention
You are required to use Adyens Javascript library for initiating the drop-in widget. This is a requirement unless you are PCI compliant.
Fetch payment methods
Build the paymentMethodsResponse needed to initiate the Adyen drop-in widget by fetching your configured payment methods. Payment methods are fetched using Adyen API payment methods.
Response received.
HTTP 200
{
  "items": [
    {
      "details": [],
      "name": "Credit Card",
      "type": "scheme"
    }
  ]
}
The Adyen drop-in widget requires a paymentMethods object with a specific structure. It is important not to tamper with the data structure as the widget may not load properly if done so.
Build your paymentMethods object with the contents of the items array found in the response from Adyen API payment methods.
Example of the final data structure for paymentMethods.
{
  "paymentMethods": [
    {
      "details": [],
      "name": "Credit Card",
      "type": "scheme"
    }
  ]
}
Example of payment method widget configuration
const configuration = {
 paymentMethodsResponse: paymentMethods //paymentMethods object
 ...
 ... //other properties
 ...
}
Adyen dropin widget example
An example implementation of the Adyen widget. This script is provided by Adyen and not Adeprimo. Hence any changes to it are not something Adeprimo can keep track of. Changes are done favorably in cooperation with Adeprimo to avoid any breaking changes. You can read more about the widget here.
Check out the code sample for an example implementation of the Adyen Javascript library.
The essential implementation requires you to implement two listeners.
- onSubmit
- onAdditionalDetails
onSubmit
This event is triggered when the user clicks the buy button in the Adyen drop-in widget.
Info
First thing you need to do when this event is triggered is to disable the buy button manually if you're using the built in button.
An example on how you might do this can be found in the code sample.
The state data from the event needs to be passed to your backend along with some browser info and other required data. Your backend then performs a request to the /place_order endpoint.
The result contains information on whether the purchase was a success or if the user needs to perform additional actions. If additional actions are required you need to pass this information to the method, dropin.handleAction in the Adyen drop-in widget.
More on additional actions in Step 4.
If the purchase resulted in success or a pending payment you do not need to perform any additional actions.
onAdditionalDetails
This event is triggered when dropin.handleAction has processed the action performed by the user.
The state data from the event needs to be passed to your backend. Your backend then performs a request to /perform additional action. Same as for the onSubmit event.
The result contains information on whether the purchase was a success or if the user needs to perform additional actions. If additional actions are required you need to pass this information to the method dropin.handleAction in the Adyen drop-in widget.
In theory, your application needs to support n number of additional action requests.
Commonly the user only performs 1 additional action and then the purchase is completed. But there are cases where additional actions can occur more than once so you need to have support for it.
Step 3 Place order
The user presses the "buy" button in the widget. Here the onSubmit event is triggered. Post the state data you receive in the event to your server and call the /place_order endpoint.
Alternatively you can use the endpoint /place_order_without_account. Using this endpoint will create a Payway account with the provided email address and trigger the event account_created_with_password_reset. This endpoint must be used with an access token without identity.
Perform request
See /adyen/place_order or /adyen/place_order_without_account for sample request and response.
Handle response
Here we can receive different types of answers. See order responses for more info. Depending on the status code received you will have to perform additional actions to complete the payment.
If the user is for example required to perform a 3DS authentication you will receive the result action_required.
The responses and appropriate actions depending on the response are described here Order responses.
Step 4 Additional actions
Depending on the payment method and the customer bank settings you will need to perform additional actions to complete the purchase.
This is often verification actions the customer needs to take to authenticate the purchase. Such as 3DS verification.
If you did not receive the status "action_required" you can proceed to Step 5.
Otherwise, you need to perform an additional action.
Perform request
Information on completing a purchase that requires additional actions such as 3DS verification are provided by Adyen. Either from the onAdditionalDetails event or by a provider redirect, such as swish or a bank.
In the case of onAdditionalDetails you'll need to post the data from Adyen to your server. There you'll collect all the body parameters and pass them in the details object.
The same is true for a provider redirect. You'll need to maintain a GET and a POST endpoint for the provider callback. You define the callback url with the return_url parameter in place_order.
In the case of a GET callback you'll need to collect all query parameters and pass them in the details object.
In the case of a POST callback you'll need to collect the body parameters and pass them in the details object.
You'll need to pass all parameters collected in a hash named details.
Example
{
  "details": {
    "param_1": "Key and value provided by Adyen",
    "param_2": "Key and value provided by Adyen",
    "param_3": "Key and value provided by Adyen",
    "param_4": "Key and value provided by Adyen",
    .....
  }
}
See /adyen/perform_additional_action in the Adyen API for a more detailed sample request and response.
Handle response
Most of the time you will only need to perform an additional action once. But sometimes the payment method requires the user to perform multiple actions. So it is possible to receive the status action_required again.
But in most cases, the purchase will be completed with one additional action.
See Order responses for more info on handling the result.
Step 5 Present the result
Inform the user of the result
Handling redirect results
If you receive an action.type redirect during Step 3 or Step 4 , Drop-in redirects your shopper to another website using an HTTP GET or HTTP POST request. The shopper will be redirected back to your website using the same method.
Attention
The redirect method depends on your payment method configuration and the length of the data included in the request, so make sure that your integration can handle both HTTP GET and HTTP POST methods. See sample application for more info.
Depending on the HTTP method you need to either collect all the query parameters(HTTP GET) or all the data passed in the request body(HTTP POST) and pass them on as a POST request to /perform_additional_action.
3D Secure 1
As of writing this 2020-02-19, 3D Secure 1 is still around and needs to be supported. This means that in the case of 3DS1 verification the user will be redirected from your site to be verified.
To support these cases you will need to define the "return_url" in Step 3. Adyen will redirect the user to this endpoint when the purchase is completed.
To complete the purchase you will need to collect all the query parameters and send them in a POST request to /perform_additional_action.
In this case, you do not need to perform any additional actions. The status received in the subsequent response should only be "complete" or "pending".
3D Secure 2
When using Adyen Web Drop-in the 3D Secure 2 authentication will happen in the widget. This is supported out of the box by the Payway - Adyen integration.
You do need to prepare the UX/UI part of the verification of course. To test it out and have a better look use these test cards.
Order responses
Purchase complete
HTTP 200 Purchase complete
{
  "item": {
    "receipt_id": "5e4becc109c04c404a46c744",
    "order_id": "ADEPRIMO-123",
    "message": "The payment was successfully authorized.",
    "status": "complete"
  }
}
"complete" then no additional actions need to be taken. The purchase has been completed and you can proceed to Step 5.
The "receipt_id" can be used to fetch the receipt for the recently made payment using the Me API.
Payment pending
HTTP 200 Payment pending
{
  "item": {
    "message": "It's not possible to obtain the final status of the payment at this time.",
    "status": "pending"
  }
}
If the status is "pending" the user has completed the payment but the final result is not yet known. Payway will receive a callback when it is.
Payway either fails or completes the payment depending on the result.
For a successful result, the events associated with a completed purchase will be triggered. For instance order_closed.
In turn, all the events associated with a failed purchase will be triggered on an unsuccessful result. For instance payment_failure.
In the meanwhile, you can proceed to Step 5.
Action required
HTTP 200 Action required
{
  "item": {
    "action": {
      "paymentMethodType": "scheme",
      "token": "eyJ0aHJlZURTTWV0aG9kTm90aWZpY...",
      "type": "threeDS2Fingerprint"
    },
    "session_reference": "session_reference",
    "message": "The issuer requires further shopper interaction before the payment can be authenticated. Returned for 3D Secure 2 transactions.",
    "status": "action_required"
  }
}
If you receive the status "action_required" you need to perform additional action(s) to complete the purchase until you receive the status "pending" or "complete".
The "action" object received needs to be passed to the dropin.handleAction method found in the script. The result from dropin.handleAction should then be sent to your server to complete the additional action by calling the /perform additional action endpoint.
You will also receive the "session_reference" again.
Proceed to Step 4 and perform it again.
Purchase cancelled
HTTP 200 Purchase cancelled
{
  "item": {
    "message": "The payment was cancelled (by either the shopper or your own system) before processing was completed.",
    "status": "cancelled"
  }
}
The purchase was canceled by the user.
Notifications
See Adyen merchant portal configuration for more information.
Links
URLs
| Name | URI |
|---|---|
| Payway API Stage Adyen base url | https://payway-api.stage.adeprimo.se/external/api/v1/adyen |
| Payway API Prod Adyen base url | https://backend.worldoftulo.com/external/api/v1/adyen |
| Adyen Customer Area Test | https://ca-test.adyen.com/ca/ca/login.shtml |
| Adyen Customer Area Production | https://ca-live.adyen.com/ca/ca/login.shtml |
Payway API Endpoints
| Name | Description | Relative url |
|---|---|---|
| Payment methods | Get payment method configuration for initializing the Adyen dropin widget | /payment_methods |
| Place order | Place the initial order | /place_order |
| Perform additional action | Perform additional action required by Adyen | /perform_additional_action |
Sample application
An example application made in Ruby can be found here.
Errors
The error response is sent as application/JSON.
An error message will contain different properties depending on the error. Some error responses will add additional data for troubleshooting. Third-party errors from Adyen for example.
Otherwise the Adyen integration adheres to the standard error conventions of the Payway API.
Testing
Before going live please be sure to complete the testing protocol.
Questions
Contact Adeprimo if you have questions or thoughts regarding the documentation and or integration. Or maybe you just want somebody to talk to.