Tulo Identity - API-only
Target audience: Developers, Stakeholders
Introduction
This document describes how you can integrate with Tulo Identity using our APIs.

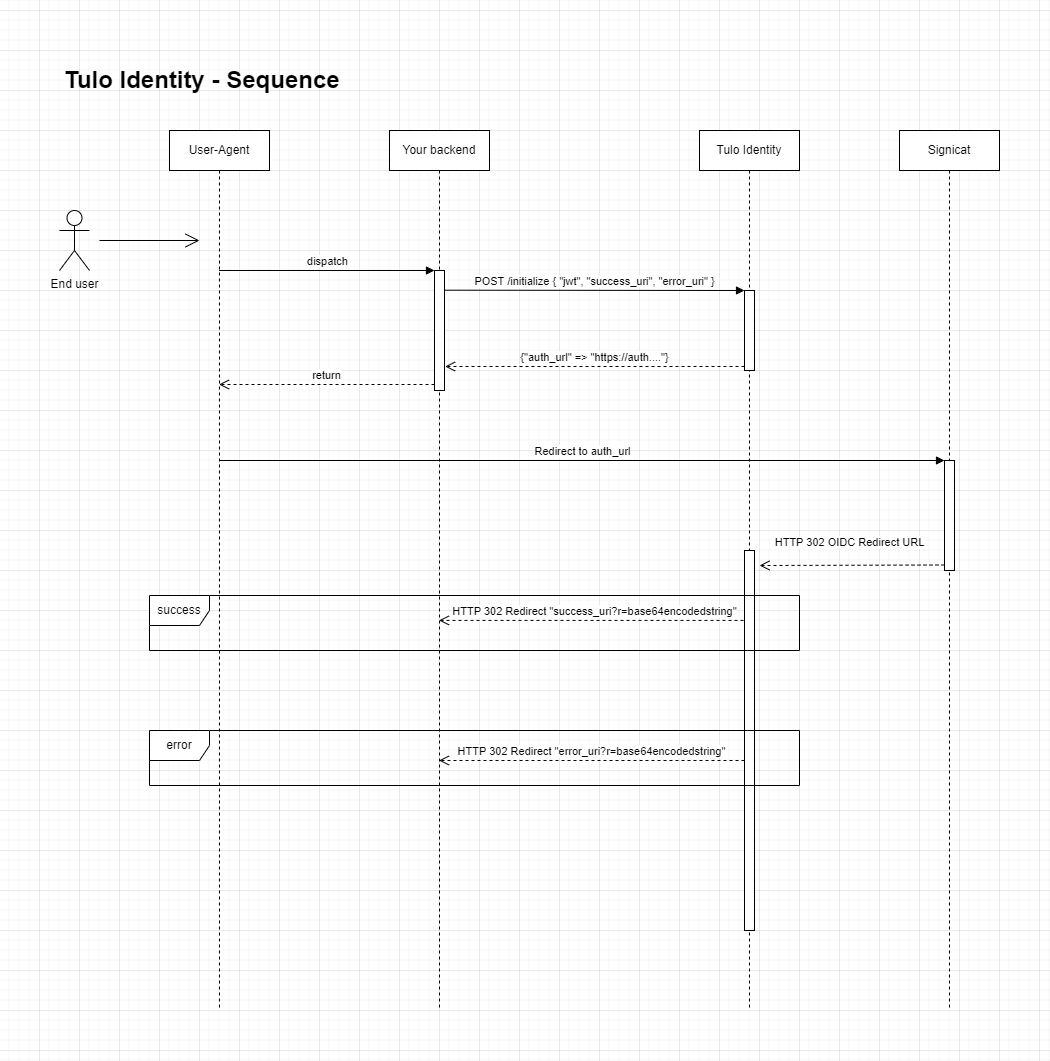
Tulo Identity sequence diagram
Step 1
Create a Tulo Identity API user
To allow communication between Tulo Identity and the Payway API you'll need to setup an API user with the following scopes.
/external/trusted_identity/w
Setup domain name
To improve branding and give the customer the feel of not being redirected out of context you can set up your domain name. This is where the customer will perform the authentication.
For example: https://auth.mysite.com. Please contact your IT department to set this up.
Contact Adeprimo
Adeprimo needs to connect the API user and set up your integration. Contact support and provide the API user client id and domain name.
Step 2
Now that the basic setup is complete you can proceed with the integration. First up is to perform the /initialize request. The endpoint returns an auth_url that is your domain name with the added required parameters.
This auth_url is the URL that you will want to send your customers to, in order for them to begin their authentication process.
Initialize
Parameters
| Name | Type | Description | Required |
|---|---|---|---|
| jwt | string | Encoded JWT | Yes |
| success_uri | string | Absolute uri that the user will be redirected to upon a successful authentication | Yes |
| cancellation_uri | string | Absolute uri that the user will be redirected to upon a cancelled authentication | Yes |
| error_uri | string | Absolute uri that the user will be redirected to when an error occurs during authentication | Yes |
| state | Must be a Base64 encoded JSON string | Keep state between your site and Tulo Identity | No |
| traceparent | Header | Tulo Identity adheres to the W3C Trace context standard | No |
| tracestate | Header | Tulo Identity adheres to the W3C Trace context standard | No |
URI
| Environment | URI |
|---|---|
| Stage | https://tulo-identity.stage.adeprimo.se/initialize |
| Production | https://identity.worldoftulo.com/initialize |
Generating a JWT Token
Information exchanged between your site and Tulo Identity is transmitted in JSON Web Tokens (JWT) that are signed and encoded. The JWT is signed using your API Client secret, both ways, which enables both your website and Tulo Identity to verify that the token has not been tampered with and that it originates from the correct sender, in possession of the shared secret. For details about creating, signing, verifying, encoding, and decoding JWT please read more on JWT.io.
A decoded JWT might look like this:
{
  "alg": "HS256",
  "typ": "JWT"
}
{
  "iss": "57221f11584d54e28b000001",
  "aud": "tulo-identity",
  "nbf": 1603455793,
  "exp": 1603542193,
  "iat": 1603455793,
}
| Claim | Type | Description | Required |
|---|---|---|---|
| iss | string | Issuer should be your Tulo Identity API user Client ID from Step 1. | Yes |
| nbf | int(epoch) | Not before should be the epoch timestamp of when this token is created. | Yes |
| exp | int(epoch) | Expires should be the epoch timestamp for 60 seconds after the token was created. | Yes |
| iat | int(epoch) | Issued At should be the epoch timestamp of when this token is created. | Yes |
| aud | string | Audience should always be "tulo-identity". | Yes |
Curl Example
curl --request POST \
  --url https://tulo-identity.stage.adeprimo.se/initialize \
  --header 'accept: application/json' \
  --header 'content-type: application/json' \
  --header 'traceparent: request-id' \
  --header 'tracestate: mytrace=123' \
  --data '{
            "jwt": "eyJhbGciOiJIUzI1NiIsInR5cCI6IkpXVCJ9.eyJzdWIiOiIxMjM0NTY3ODkwIiwibmFtZSI6IkpvaG4gRG9lIiwiaWF0IjoxNTE2MjM5MDIyfQ.SflKxwRJSMeKKF2QT4fwpMeJf36POk6yJV_adQssw5c",
            "success_uri": "https://www.mysite.com/success",
            "error_uri": "https://www.mysite.com/error",
            "state": "eyJmb28iOiJiYXIifQ=="
          }'
HTTP 200 Response
If all goes well you will receive your auth_url.
> POST https://tulo-identity.stage.adeprimo.se/initialize
> content-type: application/json
> traceparent: request-id
> tracestate: mytrace=123,tid1=request-id

{
  "auth_url": "https://auth.mysite.com/auth/open/connect/authorize?client_id=CLIENT_ID&redirect_uri=REDIRECT_URI&response_type=code&scope=openid%20profile&state=123&code_challenge=ABC123&code_challenge_method=S256"
}
Errors
If something goes wrong you will receive an error response
> POST https://tulo-identity.stage.adeprimo.se/initialize
> content-type: application/json
> traceparent: request-id
> tracestate: mytrace=123,tid1=request-id

{
  "error_code": "required_field",
  "error_message": "success_uri required",
  "error_field": "success_uri",
  "traceparent": "request-id",
  "tracestate": "mytrace=123,tid1=request-id"
}
Step 3
Redirect user
When you've received your auth_url from step 2 you'll need to redirect the user. Here the user will perform the authentication using the available providers for your account.
auth_url = "https://auth.mysite.com/auth/open/connect/authorize?client_id=CLIENT_ID&redirect_uri=REDIRECT_URI&response_type=code&scope=openid%20profile&state=123&code_challenge=ABC123&code_challenge_method=S256"

redirect auth_url
Perform authentication
Here the user identifies themselves and depending on the outcome they will be redirected back to your success_uri or error_uri provided in step 1.
Success
If all goes well the user will be redirected to the success_uri.
success_uri?r=eyJ0aWQiOiI2NGJmY2EzMzA5YzA0Y2I5YmI0YjMxNjciLCJzdGF0ZSI6ImV5Sm1iMjhpT2lKaVlYSWlmUT09IiwidHJhY2VwYXJlbnQiOiJyZXF1ZXN0LWlkIiwidHJhY2VzdGF0ZSI6Im15dHJhY2U9MTIzLHRpZDE9cmVxdWVzdC1pZCx0aWQyPXJlcXVlc3QtaWQifQ==
The parameter r is a base64-endcoded JSON string with the following content. Pay attention to the parameter tid. You will need it in the next steps.
{
  "tid": "64bfca3309c04cb9bb4b3167",
  "state": "eyJmb28iOiJiYXIifQ==",
  "traceparent": "request-id",
  "tracestate": "mytrace=123,tid1=request-id,tid2=request-id"
}
Error
If an error occurs during the authentication the user will be redirect to the error_uri.
error_uri?r=eyJlcnJvcl9jb2RlIjoiZXJyb3JfY29kZSIsImVycm9yX21lc3NhZ2UiOiJlcnJvciBtZXNzYWdlIiwiZXJyb3JfZmllbGQiOiJlcnJvcl9maWVsZCIsInRyYWNlcGFyZW50IjoicmVxdWVzdC1pZCIsInRyYWNlc3RhdGUiOiJteXRyYWNlPTEyMyx0aWQxPXJlcXVlc3QtaWQsdGlkMj1yZXF1ZXN0LWlkIn0=
The parameter r is a base64-encoded JSON string with the following content.
{
  "error_code": "required_field",
  "error_message": "success_uri required",
  "error_field": "success_uri",
  "traceparent": "request-id",
  "tracestate": "mytrace=123,tid1=request-id,tid2=request-id",
  "state": "eyJmb28iOiAiYmFyIn0="
}
The state property of the r parameter is a base64-encoded string by itself, and will as such have to be decoded separately.
Cancellation
If the user cancels an authentication, the user will be redirected to the cancellation_uri. Note that it is possible for the customer to still close their browser, which will result in an unhandled cancellation.
cancellation_uri?r=eyJlcnJvcl9jb2RlIjoiZXJyb3JfY29kZSIsImVycm9yX21lc3NhZ2UiOiJlcnJvciBtZXNzYWdlIiwiZXJyb3JfZmllbGQiOiJlcnJvcl9maWVsZCIsInRyYWNlcGFyZW50IjoicmVxdWVzdC1pZCIsInRyYWNlc3RhdGUiOiJteXRyYWNlPTEyMyx0aWQxPXJlcXVlc3QtaWQsdGlkMj1yZXF1ZXN0LWlkIn0=
The parameter r is a base64-encoded JSON string with the following content.
{
  "error": "IDP-3200",
  "error_description": "IDP-3200: User aborted the current authentication",
  "state": "eyJmb28iOiAiYmFyIn0="
}
The state property of the r parameter is a base64-encoded string by itself, and will as such have to be decoded separately.
Step 4
Done! Now you can include the tid parameter in e.q. Place an order.
{
  ....
  ....
  "secure_identification": {
    "trusted_identity_id": "64bfca3309c04cb9bb4b3167"
  }
  ....
}
That order will now be considered to be securely identified. You can verify the signature in PAP when viewing the order details.