Tulo Paywall
Target audience: Developers, Stakeholders
Introduction
This document describes how you can integrate with the Tulo Paywall (standard version).
The "Standard" version of the Tulo Paywall uses JWT tokens as the method of authentication. This allows you to utilise the Paywall to it's full potential, including Checkout-purchases, and more.
If you're simply looking for a lightweight presentation, we recommend looking at the Lite version instead.
Schema
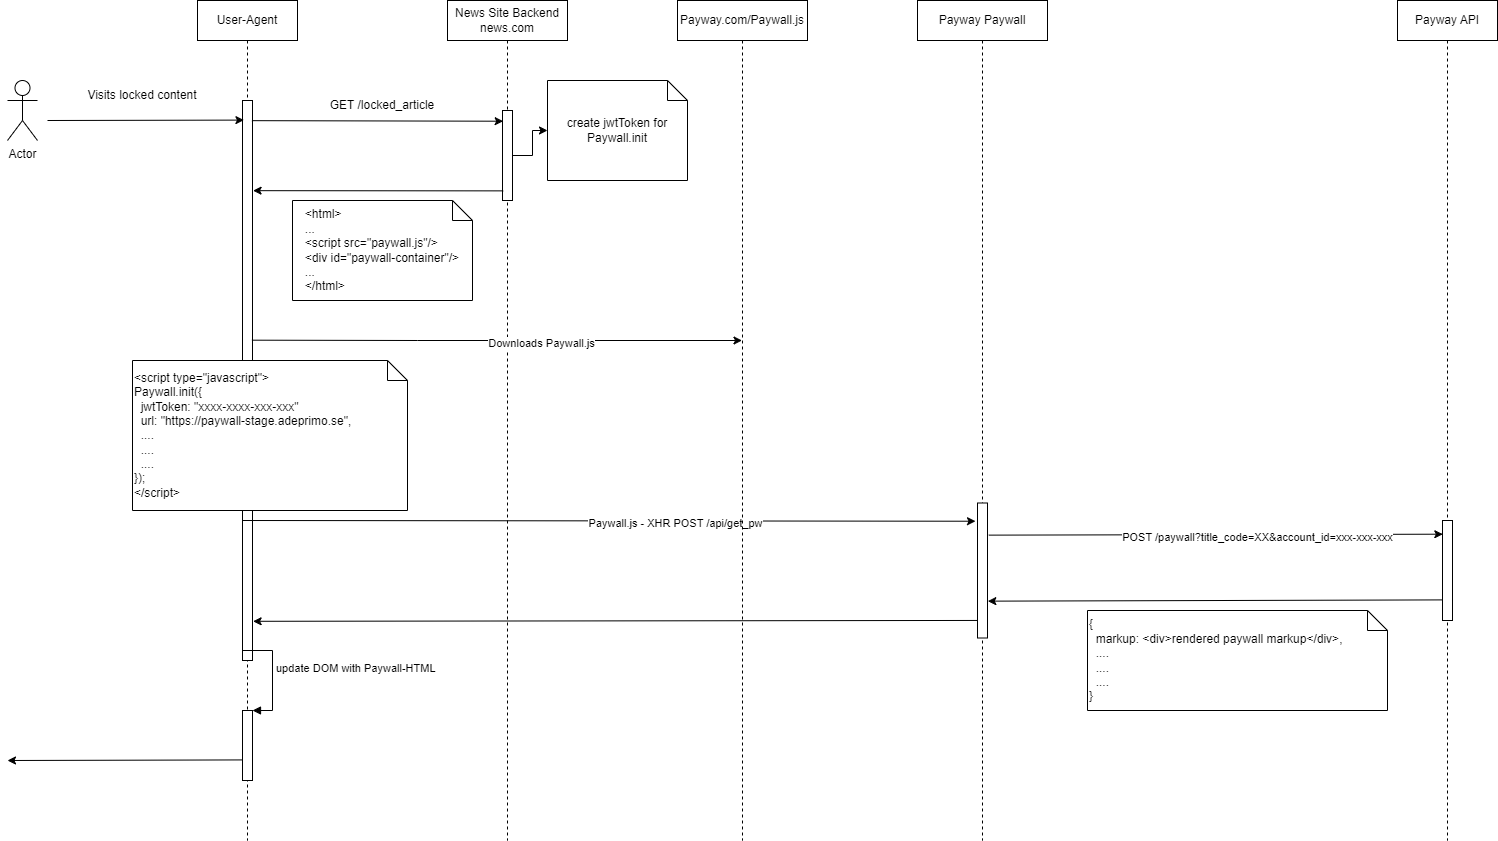 Tulo paywall schema
Step 1
Create a Tulo Paywall API user
To enable communication between your site and Payway you need to create a Tulo Paywall API user.
Info
This should not be the same user as the application rendering the Tulo Paywall. You need a separate API user that will handle all communication with the Tulo Paywall app.
The API user must include the following scopes:
/external/paywall/r /external/paywall/w
Since the communication will be done client-side rather than server-side it will also trigger a CORS request. Hence the API user must allow incoming requests from your domain. To allow client-side requests to the API you need to whitelist your domains that perform the requests to the API user.
Example of whitelisting a domain for an API user
Contact Adeprimo
Once you have your API user successfully created, you'll need to contact our support to enable the Tulo Paywalls feature. When contacting our support, the following information must be provided:
- API Key: Can be found and copied in your API user settings.
Step 2
Create your first Tulo Paywall
Once Tulo Paywalls have been enabled, you will be able to navigate to Marketing => Paywalls in the PAP and create your first paywall. To get started, we recommend you check out our guide in creating a Tulo Paywall.
Step 3
Preparing your site
Great job! If you got this far, you got your API user ready to go, and your first Tulo Paywall standing by. To start using your paywall, it will now have to be embedded on your site.
Include our CSS
For the Tulo Paywall to render correctly, you will need to include our CSS on your site. The CSS defined in this file can of course be overridden in your own CSS if you wish to do so. Choose the correct file, depending on what environment you are working in.
For more information on versions and file locations see available version of Paywall CSS.
Include our Javascript
For the Tulo Paywall to function as it should, you will need to include our JS on your site.
For information on versions and file locations see available versions of Paywall Javascript.
When to display the Paywall
Your site will need to determine if the Paywall needs to be shown to the end user. The paywall does not itself perform any access control. You can however pass information about the user to the Paywall and it can determine what offer the user will be shown, if any.
| User logged in? | User have access? | Action |
|---|---|---|
| No | No | Show paywall |
| Yes | No | Show paywall |
| Yes | Yes | Do not show paywall |
Display paywall to logged-in user
If you determine the user to be logged in and without access, you will need to provide the account_id as the claim aid when generating the JWT token.
Displaying different paywalls
You might want to display different paywalls depending on category, type, or any number of reasons. You can do that by passing in the claim pc a.k.a paywall_code when generating the JWT token.
You can find the Paywall Code in PAP under Marketing => Paywalls.
If a Paywall code is not passed in, we will instead use the Paywall marked as default for the specified title. You can read more about this functionality here.
Automatically login user after purchase
You can use ticket authentication to automatically login users after a Klarna Payments checkout purchase. You will need to provide an endpoint in your backend to redeem a ticket. Ticket login cannot be used for already logged in users.
- Define your redeem ticket endpoint as
ticketLoginUrlinTuloPaywall.Init. - The Tulo paywall will make an
application/x-www-form-urlencodedPOST request to the provided endpoint with ajwtTokenparameter in the form body. - You MUST validate the JWT using the Tulo Paywall client secret to ensure validity and to avoid man in the middle attacks.
- Redeem your
dtidusing the ticket grant to receive an Access Token.
Step 4
Generating a JWT Token
All information exchanged between the Tulo Paywall JS and the paywall is transmitted in JSON Web Tokens (JWT) that are signed and encoded. The JWT is signed using your API Client secret, both ways, which enables both your website and Payway to verify that the token has not been tampered with and that it originates from the correct sender, in possession of the shared secret. For details about creating, signing, verifying, encoding, and decoding JWT please read more on JWT.io.
A decoded JWT might look like this:
{
  "alg": "HS256",
  "typ": "JWT"
}
{
  "iss": "57221f11584d54e28b000001",
  "aud": "pw-paywall",
  "nbf": 1603455793,
  "exp": 1603542193,
  "iat": 1603455793,
  "aid": "63cfafea09c04c30c9e17c21",
  "t": "TITLE_CODE",
  "pc": "MY_SUMMER_PAYWALL"
}
| Claim | Type | Description | Required |
|---|---|---|---|
| iss | string | Issuer should be your Tulo Paywall API user Client ID from Step 1. | Yes |
| nbf | int(epoch) | Not before should be the epoch timestamp of when this token is created. | Yes |
| exp | int(epoch) | Expires should be the epoch timestamp for 60 seconds after the token was created. | Yes |
| iat | int(epoch) | Issued At should be the epoch timestamp of when this token is created. | Yes |
| aud | string | Audience should always be "pw-paywall". | Yes |
| t | string | Title is the title code for the site where the Tulo Paywall is being initialized. | Yes |
| aid | string | Account ID of the logged in user. Exclude or leave empty for anonymous. | No |
| pc | string | Paywall Code. Fetch a specific paywall. Returns first available for title if left empty | No |
| tcid | string | Target Client ID. The application for which you want to issue a ticket for login. Only available for Klarna Payments checkout | No |
| tv | boolean | Track Visitor. When true, the visitor's account id (aid) is forwarded to Engage as userId on the tracker context and on the purchase_end event. Defaults to false. See Visitor identification. |
No |
Step 5
Embedding your Tulo Paywall
See the Paywall Javascript documentation for more information on how to embed your Tulo Paywall on your site.
Step 6
Events
See events for a complete list of what events are triggered, and when.
Step 7
Test & go live
Once everything above is said and done, we highly recommend you take some final steps before publishing your Tulo Paywall to a production environment:
- Test your Tulo Paywall and implementation in a testing/staging environment.
- Make sure the Tulo Paywall renders correctly, and no errors in the browser console are shown.